
Related articles
Applies to
Personas
-
Administrators
-
Content Developers
-
Booklet Publishers
-
Scan Uploaders
-
Proctors
-
Graders
Prerequisites
Before following this playbook, ensure that:
-
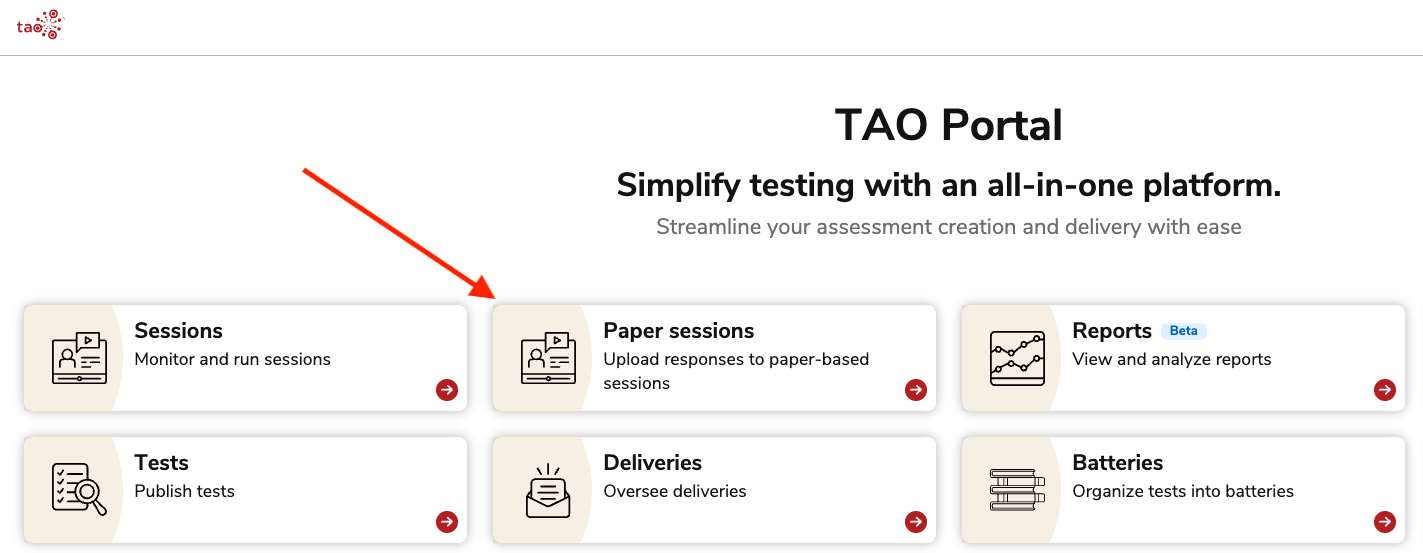
Paper-based sessions have been enabled for your organization. Contact your Account Manager if this feature is not available.
Hint: You can check if Paper-based sessions are enabled for your organization if you can see a Paper sessions tile on your TAO Portal home screen.
-
The Hybrid session access option is enabled in System Settings under Paper-Based testing.
Purpose
Paper-based sessions allow organizations to combine handwritten responses with TAO’s digital delivery and scoring workflows. Test-takers view test content in TAO while writing eligible essay responses on printed response sheets that are scanned and uploaded back into the system. The purpose of this is to score items digitally and integrate them back into the digital flow in TAO.
This playbook explains how to: prepare eligible items, configure groups and roles, create paper-based sessions, generate booklets, upload scanned responses, and prepare responses for manual scoring.
Recommended workflow
When creating and delivering paper-based sessions, follow these phases:
-
Author eligible paper-response items.
-
Create and publish the test.
-
Assign paper-based session roles to users in a group.
-
Create the paper-based session and assign to the group.
-
Generate, print, and distribute booklets.
-
Scan and upload completed response sheets.
-
Verify uploads and score responses.
Workflow
1. Author eligible items for paper responses
This step applies to Content Developers in TAO Authoring (Content Bank).
Only eligible essay items generate printed response sheets.
An item will generate a paper response sheet only if:
-
It contains exactly one Extended Text interaction.
-
The interaction is set to Rich Text mode.
Important: Items that do not meet these conditions are ignored during booklet generation. Items with multiple interactions or non-essay interaction types remain digital only.
To create a paper-response item:
-
Create an Extended Text interaction.
-
Use one interaction per paper-based item.
-
Set the interaction to Format > Rich Text.
-
Add passages, text boxes, or context as needed.
-
Passages and supporting content are displayed in the online test, but they are not included on the printed response sheet.
-
-
Select Response within the interaction and create one or more Outcome Declaration (do not edit the default Score outcome declaration).
-
Set the Outcome Declaration(s) for Human for manual scoring.
-
Scanned responses appear automatically in the scoring interface. No special scoring configuration is required beyond preparing the item for manual scoring.
-
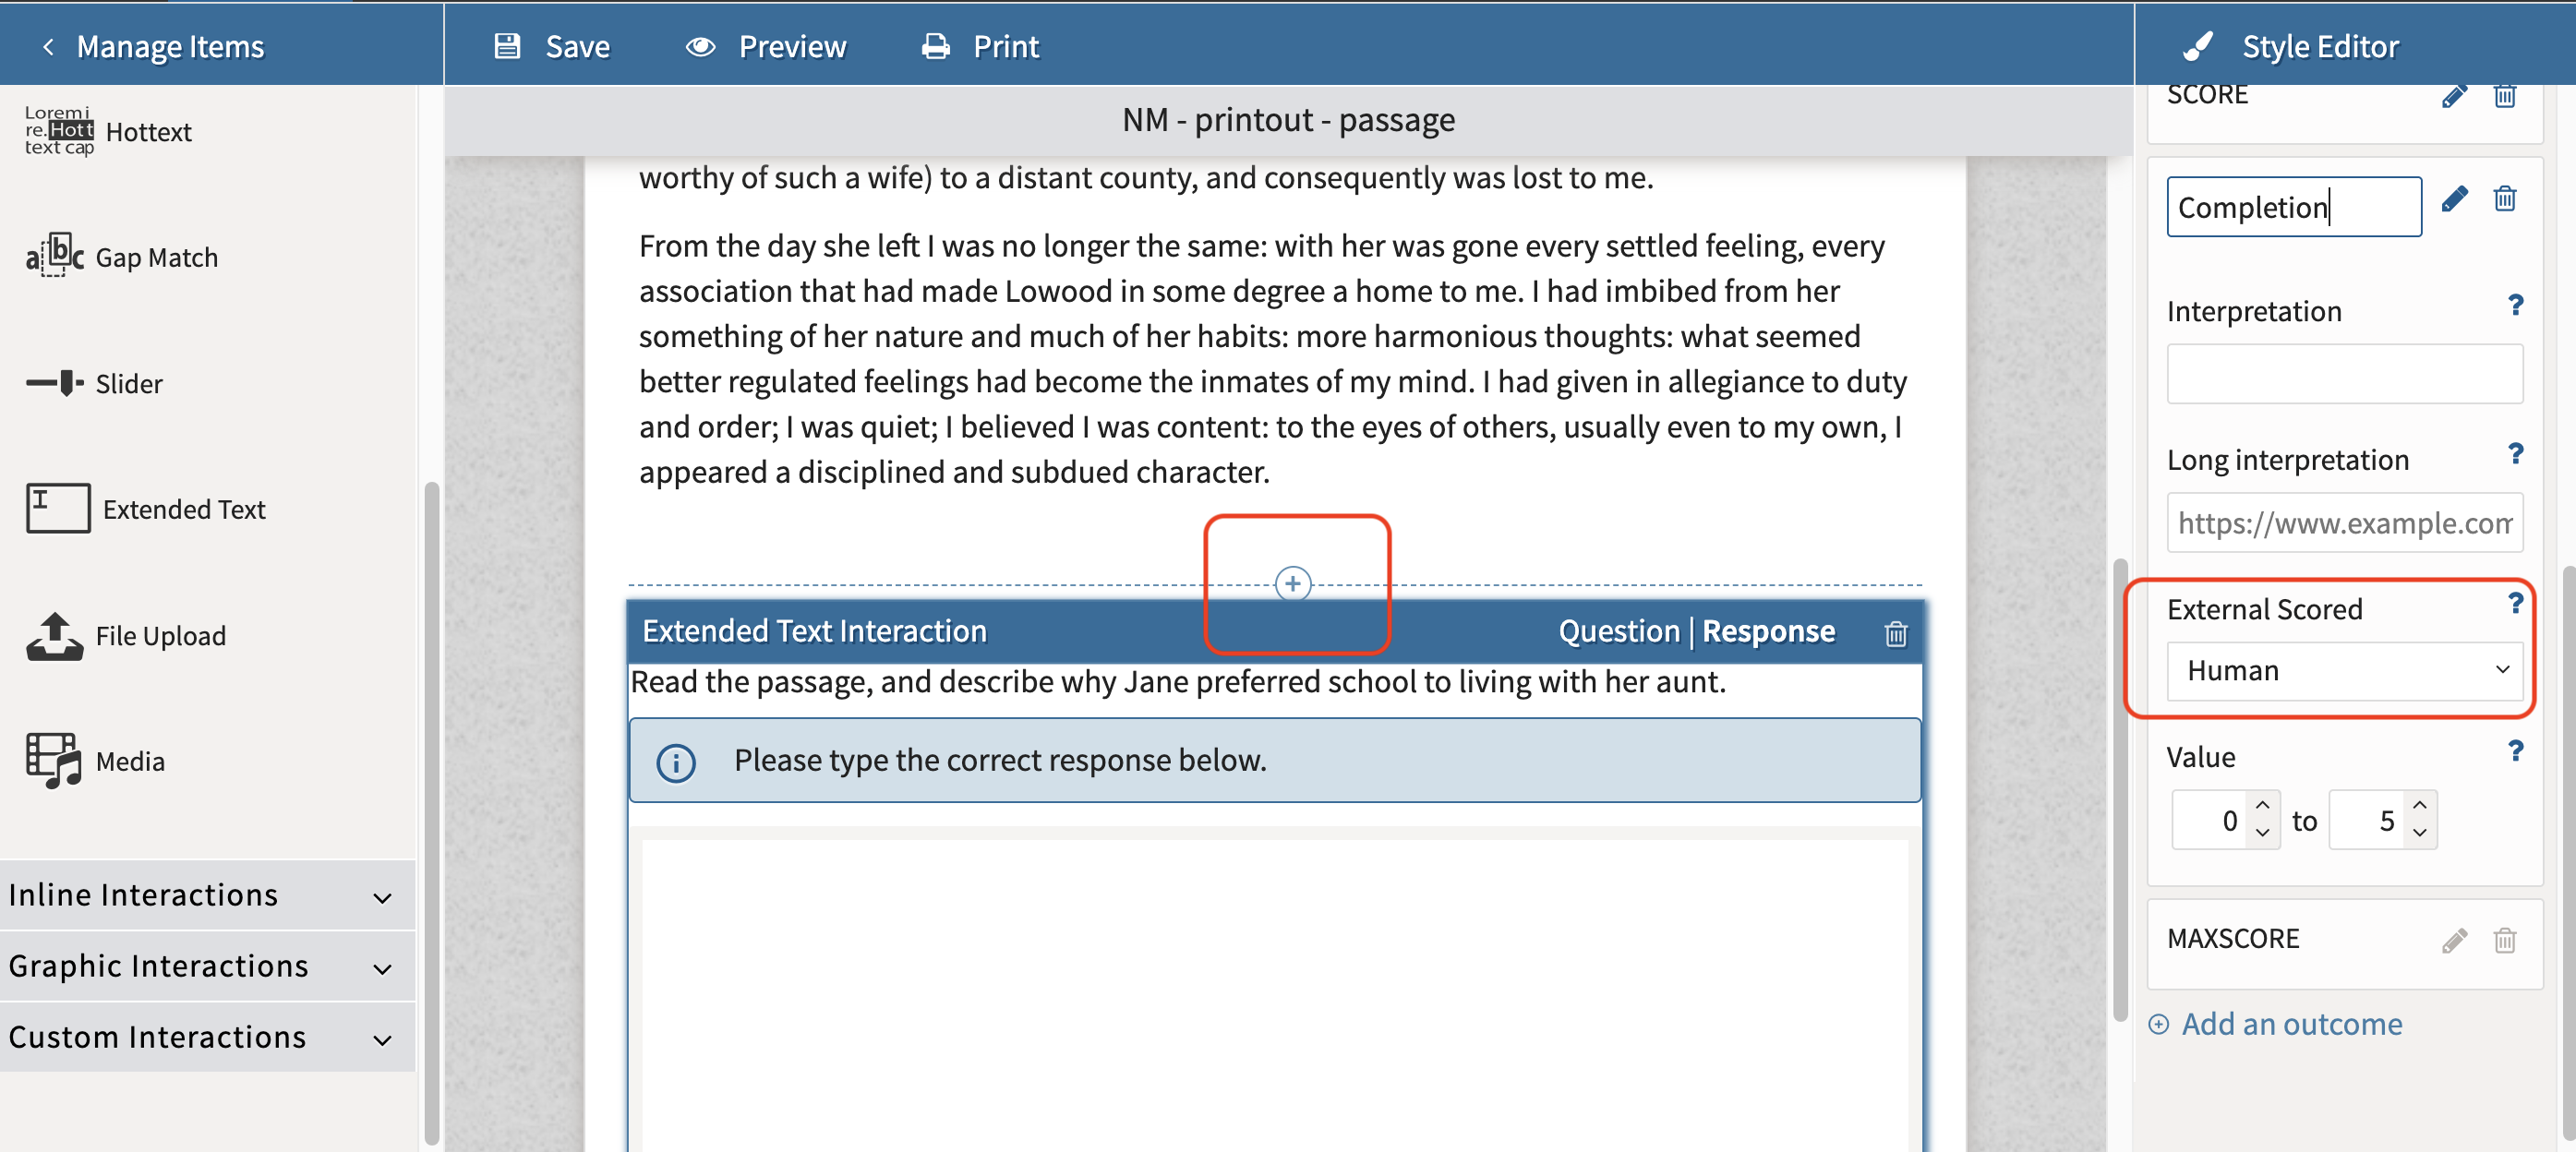
The Document Type and Constraints settings do not apply to paper-based test items. Each response area is generated as a blank sheet, and the number of sheets per interaction is determined in the session configuration.
2. Create and publish the test
This step applies to Content Developers in TAO Authoring (Content Bank).
-
Follow the standard process for creating a test.
-
Include eligible Extended Text interactions for paper responses.
-
Combine paper-response items with other item types if creating a hybrid test.
-
-
Publish the test as a delivery.
Only eligible Extended Text items generate printed response sheets; however, a single hybrid test can include both:
-
Paper-based responses, such as essay items.
-
Digital responses, such as multiple-choice items.
Tip: If you are creating a hybrid test, consider placing digital, non-Extended Text items in a separate test part. Some test settings, such as paths and prerequisites, do not apply to paper-based sessions.
3. Assign Paper-based session roles
This step applies to Administrators in TAO Portal.
Paper-based sessions use two specialized group roles.
|
Role name |
CSV value |
Capabilities |
|---|---|---|
|
Booklet Publisher |
BOOKLET_PUBLISHER |
Generate PDF booklets and view session progress |
|
Scan Uploader |
SCAN_UPLOADER |
Upload and view scanned responses, in addition to Booklet Publisher permissions |
The Scan Uploader role includes all Booklet Publisher permissions.
To assign roles, either:
1. Create/upload or edit a group
-
On TAO Portal: Creating a new group
-
CSV import: Importing/updating groups (for descriptions of each field in the
groups.csvtemplate)
2. Assign user(s) roles to group
-
On TAO Portal: Assign the users to each role either from the group or from editing the user:
-
CSV import: In the
group_rolefield, assign the paper-based session role (Importing/updating users (with an existing group)):-
BOOKLET_PUBLISHER -
SCAN_UPLOADER -
Follow the instructions in Importing data via CSV file to upload the file.
-
To add a scorer to the group, assign the
GRADERrole.
-
4. Create a Paper-based session
This step applies to Administrators in TAO Portal.
-
Open the Sessions module in TAO Portal.
-
Follow the standard session creation process.
-
Under Paper-Based options, select Paper-Based session.
-
Populate the paper-based session fields (see below).
-
Complete any other session configuration options.
-
Click Create Session.
-
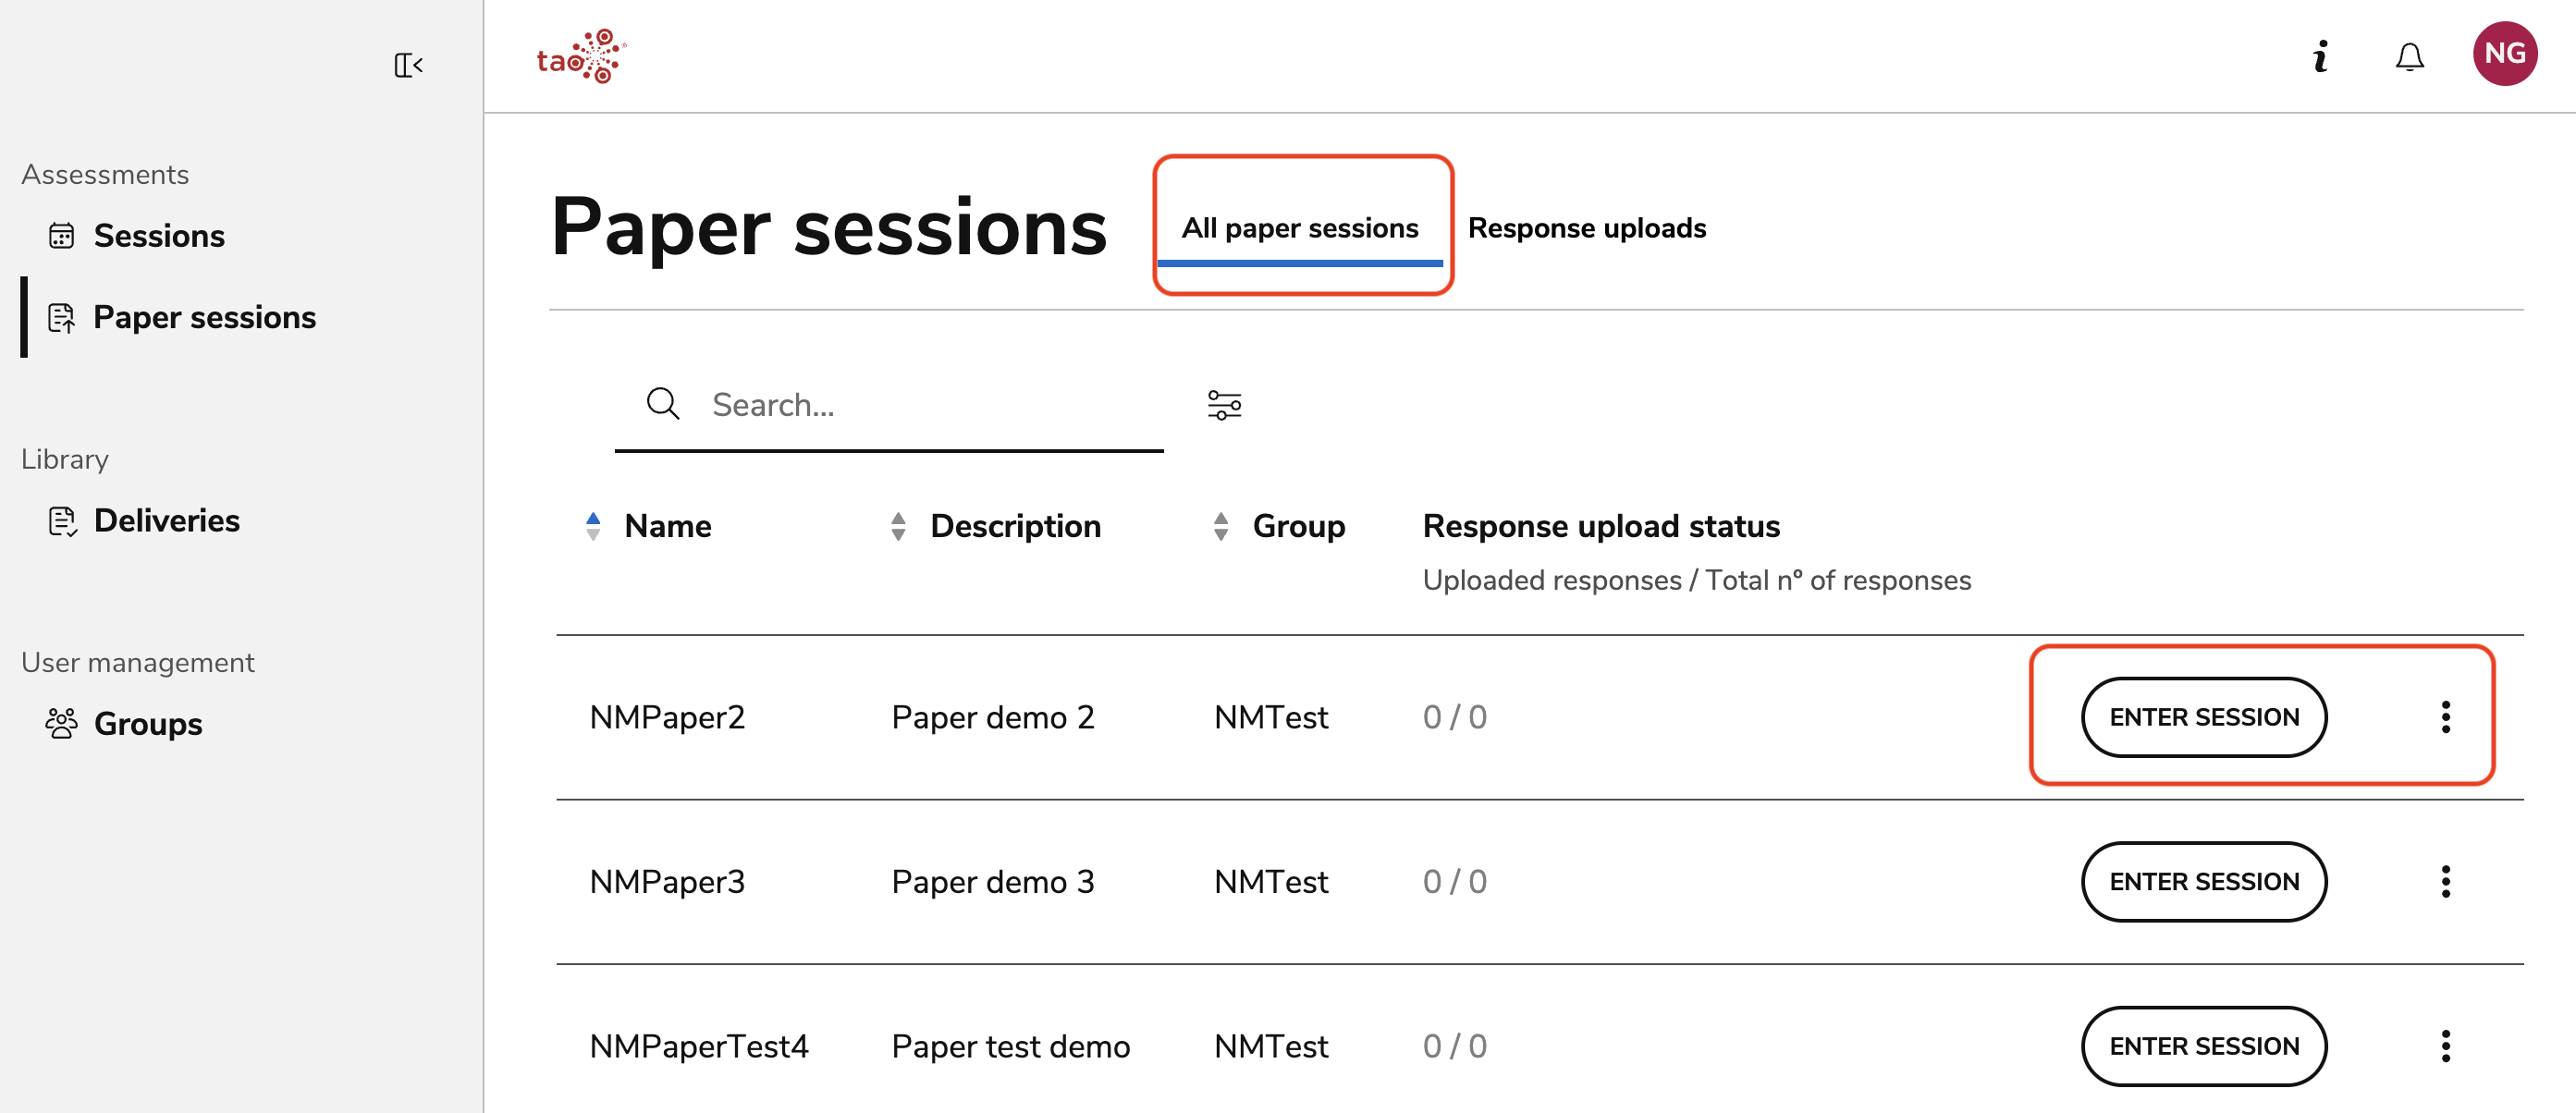
After the session is created, go to the Paper sessions module. The new paper session appears in the session list, where authorized users can enter the session or generate a booklet.
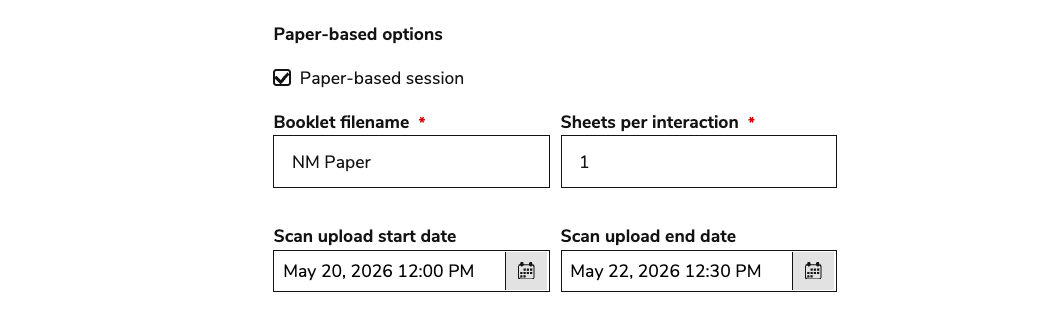
Paper-based session fields include:
|
Field |
Description |
|---|---|
|
Booklet filename |
Mandatory PDF booklet filename, such as |
|
Sheets per interaction |
Mandatory number of response sheets per item; must be at least 1 |
|
Scan upload start date |
Date when Scan Uploaders can begin uploading completed responses |
|
Scan upload end date |
Date when Scan Uploaders can no longer upload completed responses |
Other session settings apply to what the test-taker sees during the online portion of the test.
5. Generate PDF booklets
This step applies to Administrators and Booklet Publishers (or Scan Uploaders) in TAO Portal.
Booklet Publishers generate PDF booklets containing response sheets for eligible essay interactions.
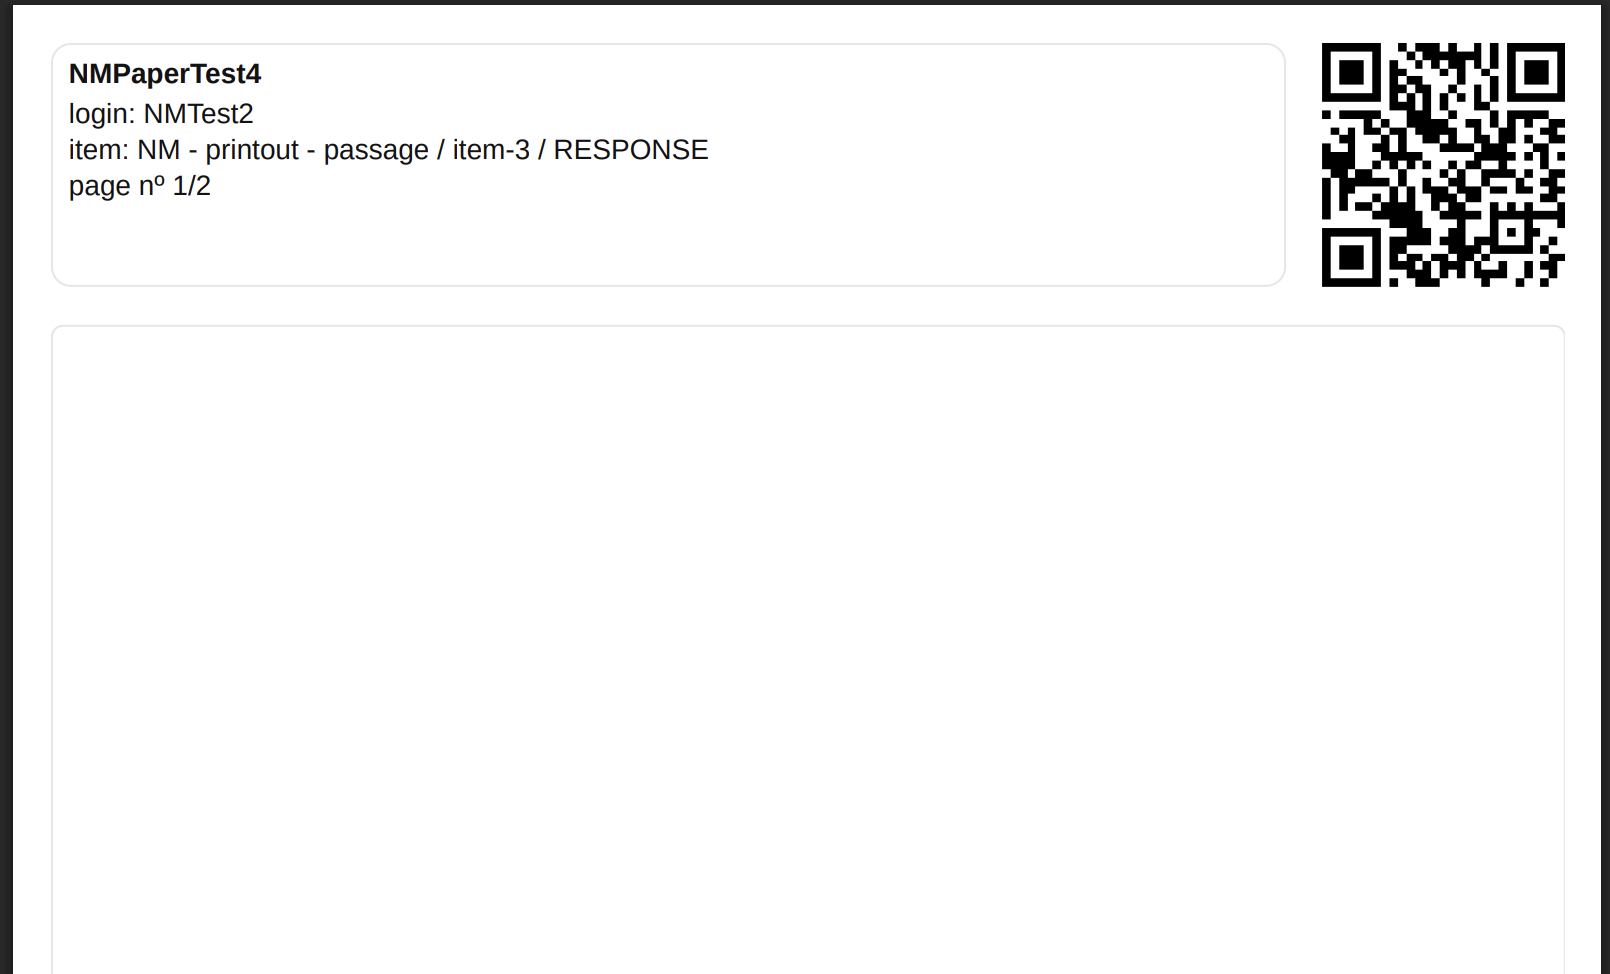
Each response sheet includes:
-
A QR code used to match the scanned page to the correct session, test-taker, item or interaction, and delivery execution.
-
Human-readable identifiers, such as test-taker name and item information.
-
A writing area for the candidate response.
To generate booklets:
-
Log in to TAO Portal.
-
Navigate to Paper Sessions.
-
Locate the paper-based session.
-
Generate the booklet from either:
-
the three-dot menu in the session list, or
-
the Generate Booklets link in the session overview.
-
-
Download the generated PDF from the active notification or notification manager.
The PDF booklet limit is 400 pages. If the booklet exceeds this limit, the Booklet Publisher is prompted to reduce test-taker enrollment.
6. Print and distribute booklets
This step applies to Administrators and Booklet Publishers (or Scan Uploaders) in TAO Portal.
Print booklets carefully to preserve QR readability.
Recommended practices:
-
Print single-sided.
-
Ensure QR codes are clear and undamaged.
-
Confirm each test-taker receives the correct booklet.
-
Verify the expected number of response sheets per item (from session configuration)
Each response sheet includes the QR code, item name, sheet position (e.g. 2/3), and test-taker name.
During delivery, test-takers view questions and supporting materials in the online session and write their responses on the corresponding paper sheets. Proctors can monitor test-taker progress using the live monitoring view.
7. Monitoring paper sessions
This step applies to Administrators and Proctors in TAO Portal.
-
Navigate to Paper Sessions.
-
The session list shows all paper-based sessions available to your group.
-
-
Click Enter session to view the session details. The session overview shows:
-
Summary bar: Group, number of assigned test takers, session status counts (Not started, In progress, Finished), and scoring status
-
Test taker table: Each test-taker with their name, session status, response upload progress, and scoring status
-
-
Click Monitor Live. Proctors may view test takers' progress in the live monitoring view.
The test taker will view the questions and any corresponding materials in the online session, and write their responses on the corresponding sheets.
8. Collect, scan, and upload response sheets
This step applies to Administrators, Proctors, and Scan Uploaders in TAO Portal.
Before uploading, ensure:
-
QR codes are visible and undamaged.
-
Scans are high enough quality to capture QR codes and handwritten responses.
-
Pages are scanned straight rather than tilted.
-
The scan upload window is active.
After testing:
-
Collect all completed response sheets.
-
Scan the sheets into PDF files.
-
Log in to TAO Portal as a Scan Uploader.
-
Navigate to Paper Sessions.
-
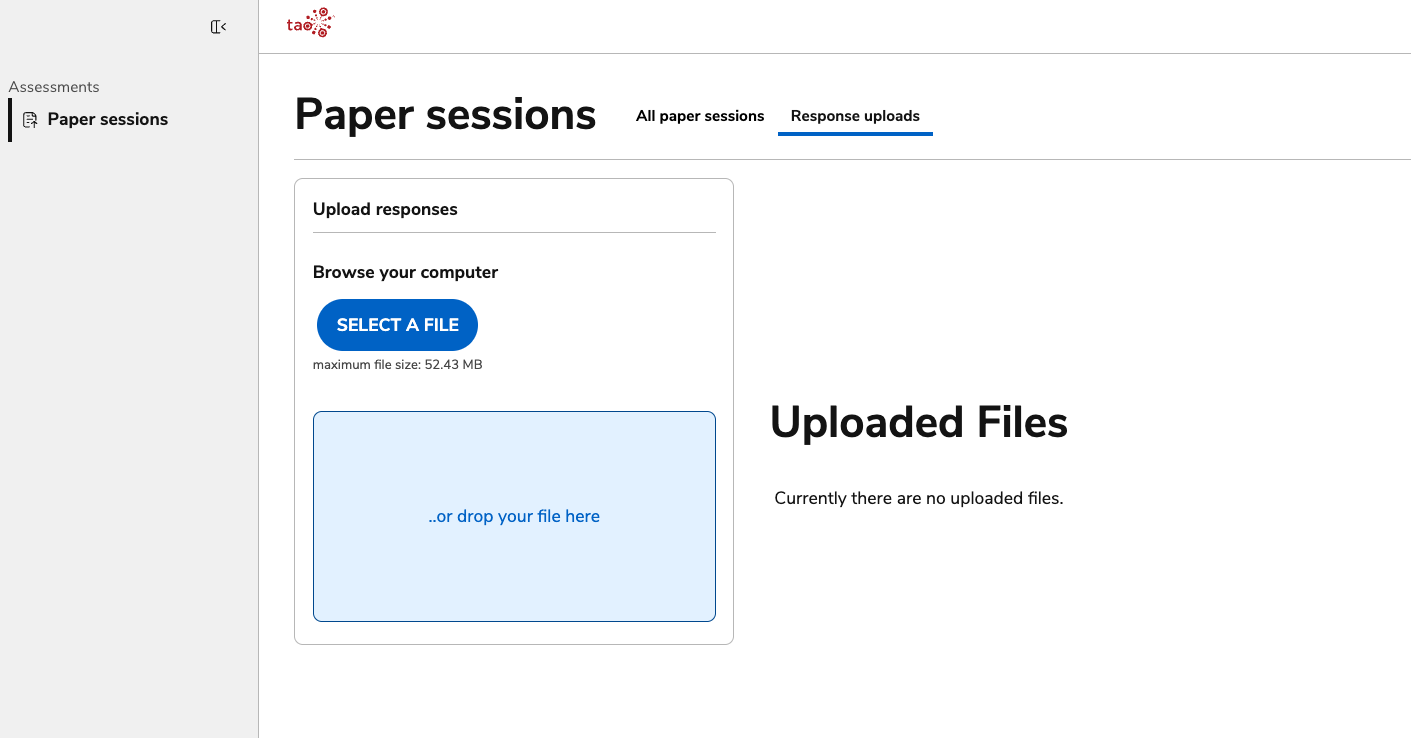
Open the Response Uploads tab.
-
Select a file or drag and drop the PDF into the upload area.
When uploading a PDF, the upload report displays an error for any pages that matches responses in session where the current user is not enrolled as a Scan Uploader. No scan is attempt will apply to those responses.
Uploaded PDFs can include:
-
Multiple test-takers’ response sheets.
-
Response sheets from multiple sessions.
-
Pages in any order.
The maximum upload file size is 52.43 MB. There is no limit on the number of upload attempts or files.
9. Review upload progress
This step applies to Administrators and Scan Uploaders in TAO Portal.
How TAO processes scans
-
TAO reads QR codes per response sheet page
-
Matches pages to:
-
Test-taker
-
Session
-
Item
-
-
Attaches the test taker’s response to the QR code
Processing may take seconds to minutes depending on volume.
The Scan Uploader’s view contains two tabs:
-
All paper sessions: View all paper sessions for groups where you are enrolled as the Scan Uploader.
-
Click Enter session to view a session’s details. From this view you can:
-
Compare expected vs uploaded pages per test-taker
-
View which test takers have finished or need scoring
-
The Scan Uploader’s session overview includes a Review test button for each candidate.
-
-
-
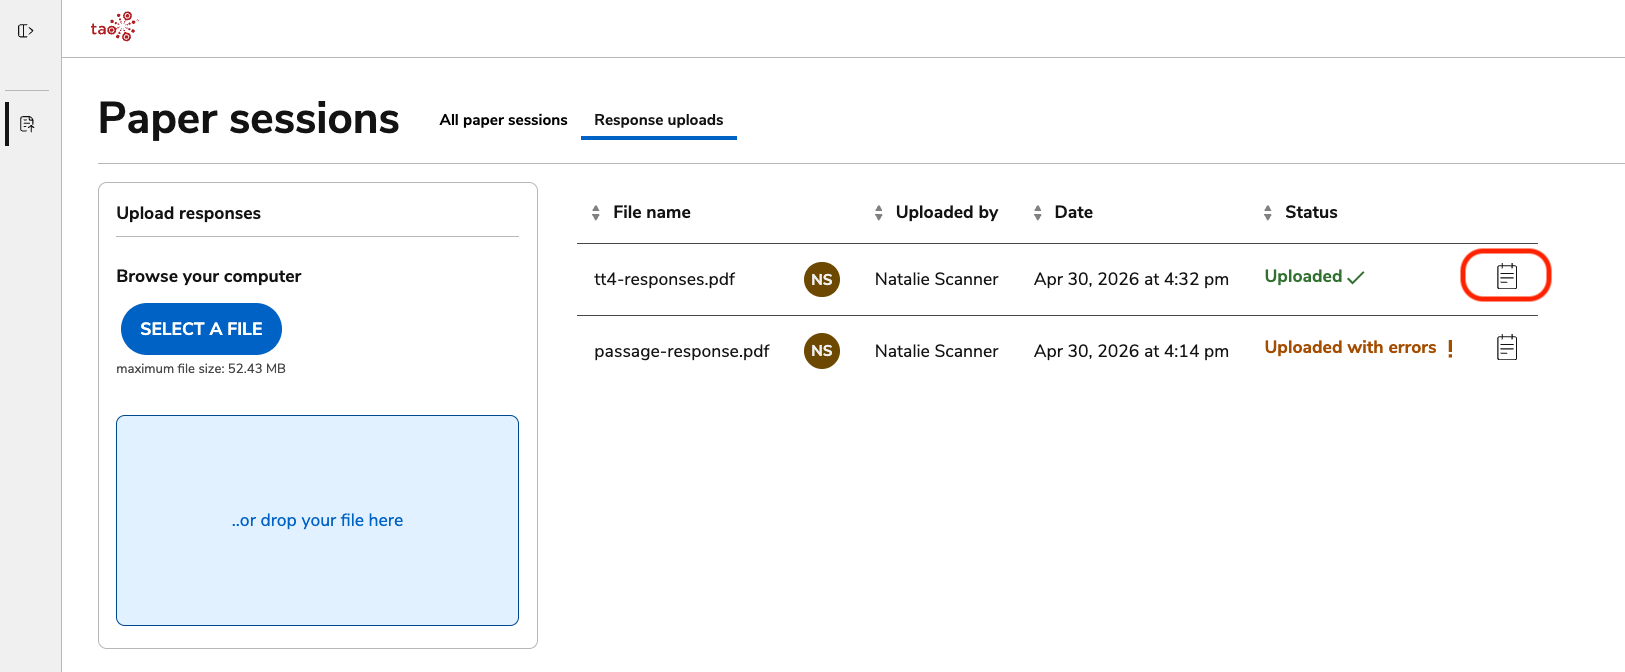
Response uploads: Upload responses and view upload history.
-
The response upload status shows uploaded responses compared with total expected responses, such as
4 / 4. A green checkmark indicates that all expected pages have been received. -
Once the status for each test taker’s response is Uploaded, you can select the button on the right side of each listed scan to view each response separately.
-
Check for:
-
Successfully matched pages
-
Unmatched pages (QR issues)
-
-
10. Resolve QR code issues
This step applies to Administrators and Scan Uploaders in TAO Portal.
QR code damage can prevent automatic matching.
If a QR code cannot be read, use one of the following workarounds and re-upload the corrected file.
Physical fix
-
Print the original QR code again from the booklet PDF.
-
Cut and paste it over the damaged QR code area on the response sheet.
-
Re-scan the page.
-
Re-upload the corrected PDF.
Digital fix
-
Open the PDF in an image or PDF editing tool.
-
Replace the damaged QR code area with a clean digital version of the original QR code.
-
Save the corrected file.
-
Re-upload the PDF.
12. Scoring Paper-based responses
This step applies to Administrators and Scorers in TAO Portal.
Once scanned responses are successfully uploaded, they become part of the test-taker’s response set.
If the test also includes digital responses, both paper-based and digital responses are included in the same response set. Scorers can then score the session using the standard manual scoring method.