
This guide explains how to install TAO Community Edition (TAO CE) using Docker.
Container
TAO CE supports deploying its resources as a container using Docker for local development and evaluation.
Prerequisites
-
Install Docker for your environment by visiting Get Docker.
-
If you are using Docker Desktop, allocate at least 4 GB of memory.
-
Open Docker Desktop.
-
Go to Settings > Resources > Memory.
-
Adjust the memory allocation if needed.
-
Retrieve and deploy the TAO CE container
The core TAO CE resources are hosted on http://quay.io/tao-ce/tao-ce:latest . Follow the steps below to pull and deploy the container.
If you have previously installed TAO CE, delete all existing TAO CE containers, volumes, and images from Docker before continuing.
Steps
-
Download the ZIP archive containing the
docker-compose.tao-ce.yamlfile from the following URL and unzip it:
https://gist.github.com/tao-community-edition/5ac924d5021aa2d7d3635064edc0e752/archive/eb21e720043a3278655516ae1e5993ef6ca2e3f4.zip -
Open a terminal or command prompt.
-
Navigate to the folder where the ZIP file was extracted.
-
Run the following command:
docker compose -f docker-compose.tao-ce.yaml up -d -
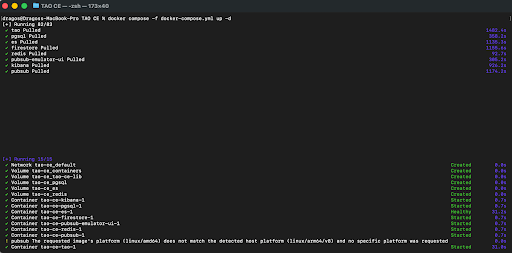
Wait for all volumes to be created and all containers to start. When the process completes, the services should be running successfully and you will see something like this:
Optional hosts configuration (recommended)
Configuring a local host entry simplifies access to TAO CE.
Linux and macOS
-
Open the
/etc/hostsfile with administrator privileges. -
Add the following line:
0.0.0.0 community.tao.internal -
Save the file.
Windows
-
Open
C:\Windows\System32\drivers\etc\hostswith administrator privileges. -
Add the following line:
127.0.0.1 community.tao.internal -
Save the file.
Access TAO CE
-
Open a web browser.
-
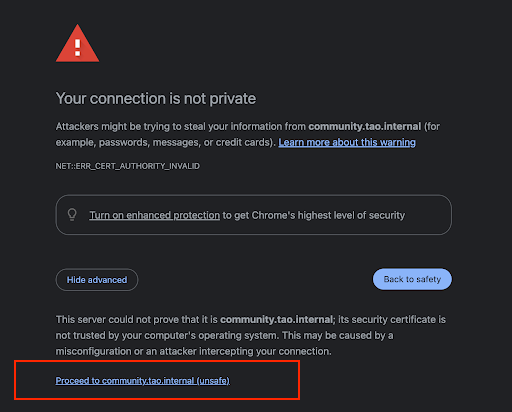
If a certificate warning appears, proceed to community.tao.internal. In Chrome, for example select Advanced > Proceed:
-
Log in using the default credentials:
-
Username: admin
-
Password: password
-
Immediate action required: change passwords
For security reasons, all default passwords must be changed immediately after installation.
Change the admin password
-
Click your user avatar in the top-right corner.
-
Select My account.
-
Click My user.
-
Click Change password.
-
Enter a secure password with at least 8 characters, including at least one lowercase letter, one uppercase letter, and one number or symbol.
-
Click Save changes.
You may see a warning that your password is not safe enough, despite following the recommended constraints. You can ignore it, as this is a known issue which will be resolved in a future version.
Change test-taker passwords
The following test-taker users are preconfigured: demo01 to demo05. The default password for each user is password.
Steps
-
From the Portal, click the Users tile.
-
Locate the users with the Test taker role (demo01 to demo05).
-
For each user:
-
Open the context menu.
-
Select Edit.
-
Click Change password.
-
Enter a secure password.
-
Click Save changes.
-
Performance expectations
Concurrent users
The system has been tested with up to 500 concurrent test-takers, using a ramp-up of 25 users per second. All test-takers were able to submit their tests successfully.
Login performance
-
At 500 concurrent test-takers, login delays of up to 1–2 minutes were observed. All users were eventually able to log in.
-
At 200 concurrent test-takers, login delays were acceptable, with a maximum delay of approximately 7 seconds.