Configuring scoring for tests
Test scores are determined by a student’s performance in the various Items of a Test. Individual item scores can be tallied using different methods to produce the final test result. This chapter shows how to configure the test scoring rules, and compute the Outcome Declarations (i.e. define the scoring criteria).
Item scoring
The scoring methods to be employed for specific items or tests need to be defined before they can be used in assessments, during item authoring. For information on the scoring rules used for items, see the following topics:
Scoring properties
Follow the steps below for more detailed descriptions on outcome processing options, as well as the procedure of setting up your chosen scoring method.
1. Locate Test Properties.
After you have created your test by selecting the items which are to go in it, click on the cog wheels at the same level as the test label, just below the Action Bar, at the top of the right-hand corner of the Canvas. The general properties of the test will be displayed in the right-hand panel, including the properties for scoring.
2. Click on the button Scoring.
There are four methods for scoring a test, or “outcome processing” as this is called in QTI. Enter your choice from the four options below in Outcome Processing:
3. Define Outcome processing
The scoring method to be employed for a specific test is defined after that test has been created, before it can be used in an assessment.
There are 4 possibilities for defining how to compute the score for a test (outcome processing):
None: No test score is computed in the end; item scores are still calculated and can be exported individually.
Custom: Complex scoring scenarios can be implemented in the QTI XML, via the XML Editor; typically used for adaptive testing
Total Score (most common option): Allows the score to be computed for the whole test; this option also allows category scoring.
Cut score: Allows test authors to define Pass / Fail conditions (such as a pass ratio); this can be combined with category scoring.
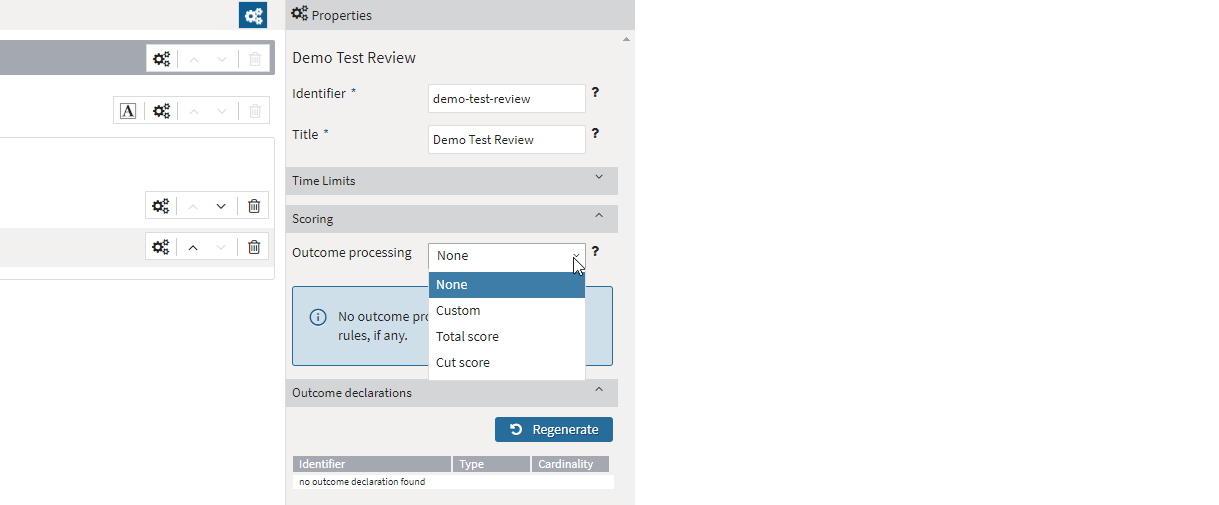
Outcome processing - test scoring
None
If this option is selected, any existing scoring rules will be removed. In this case, no test score will be generated. Use this option if you do not need aggregated test scores, or want to do custom outcomes processing outside of TAO.
Custom
This option is only applicable when a test with custom processing rules is imported – i.e. the processing rules are defined outside of TAO. Custom rules can be edited outside of the test assembly page, via the XML Editor. In the test assembly page, select your (external) scoring rule which states how you would like the test taker responses to the item to be processed.
An example of an application for custom processing rules would be if you want to take multiple interactions (in the same item) into consideration. You may want to specify, for example, that if the test-taker completes interaction A or interaction B correctly – but not both – they are awarded half the score (half of the computed MAX_SCORE). You can customize the processing rules to do this.
Total Score
If you select this as your chosen method, all scores from all parts of the test will be added together, and outcome variables for the test-taker’s score (SCORE_TOTAL), the maximum score of all items (SCORE_TOTAL_MAX) and the ratio of correct responses (SCORE_RATIO) will be generated (and will display in the Outcome declarations field in the Properties panel).
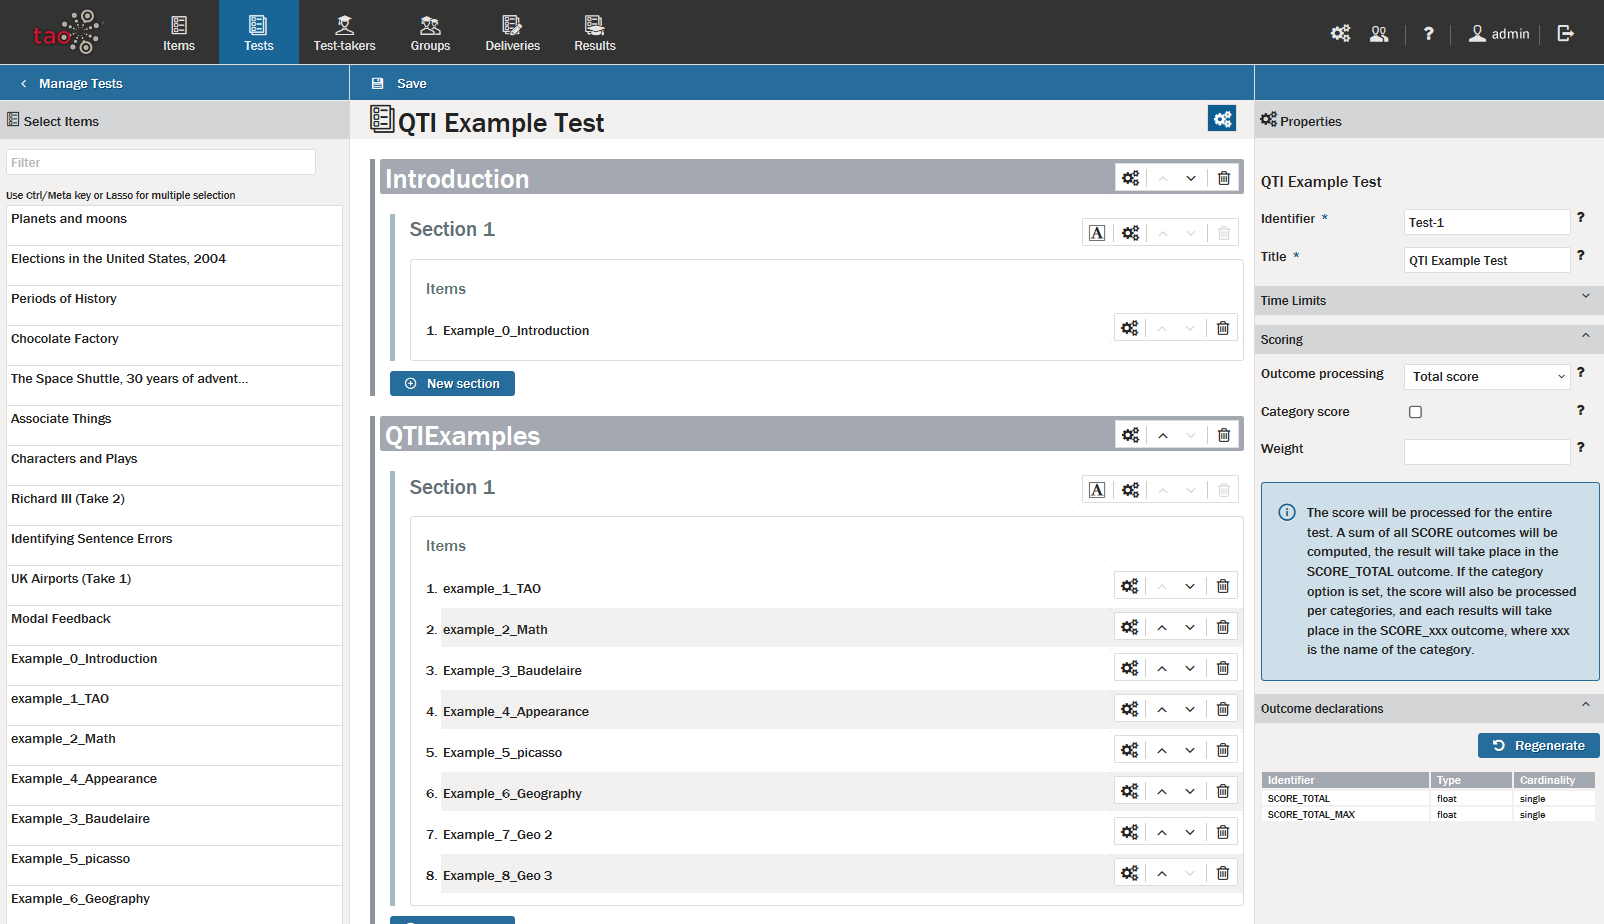
Scoring: Total score
Cut Score
If you choose this option, a cut-off point for passing the test can be defined. This is set as a ratio between the total score and max score. Enter this ratio as a 0 to 1 decimal number. A PASS variable is then generated, indicating if the student has passed the test. When “Category Score” is active (see below), PASS variables for all categories are generated, all using the same cut-off point.
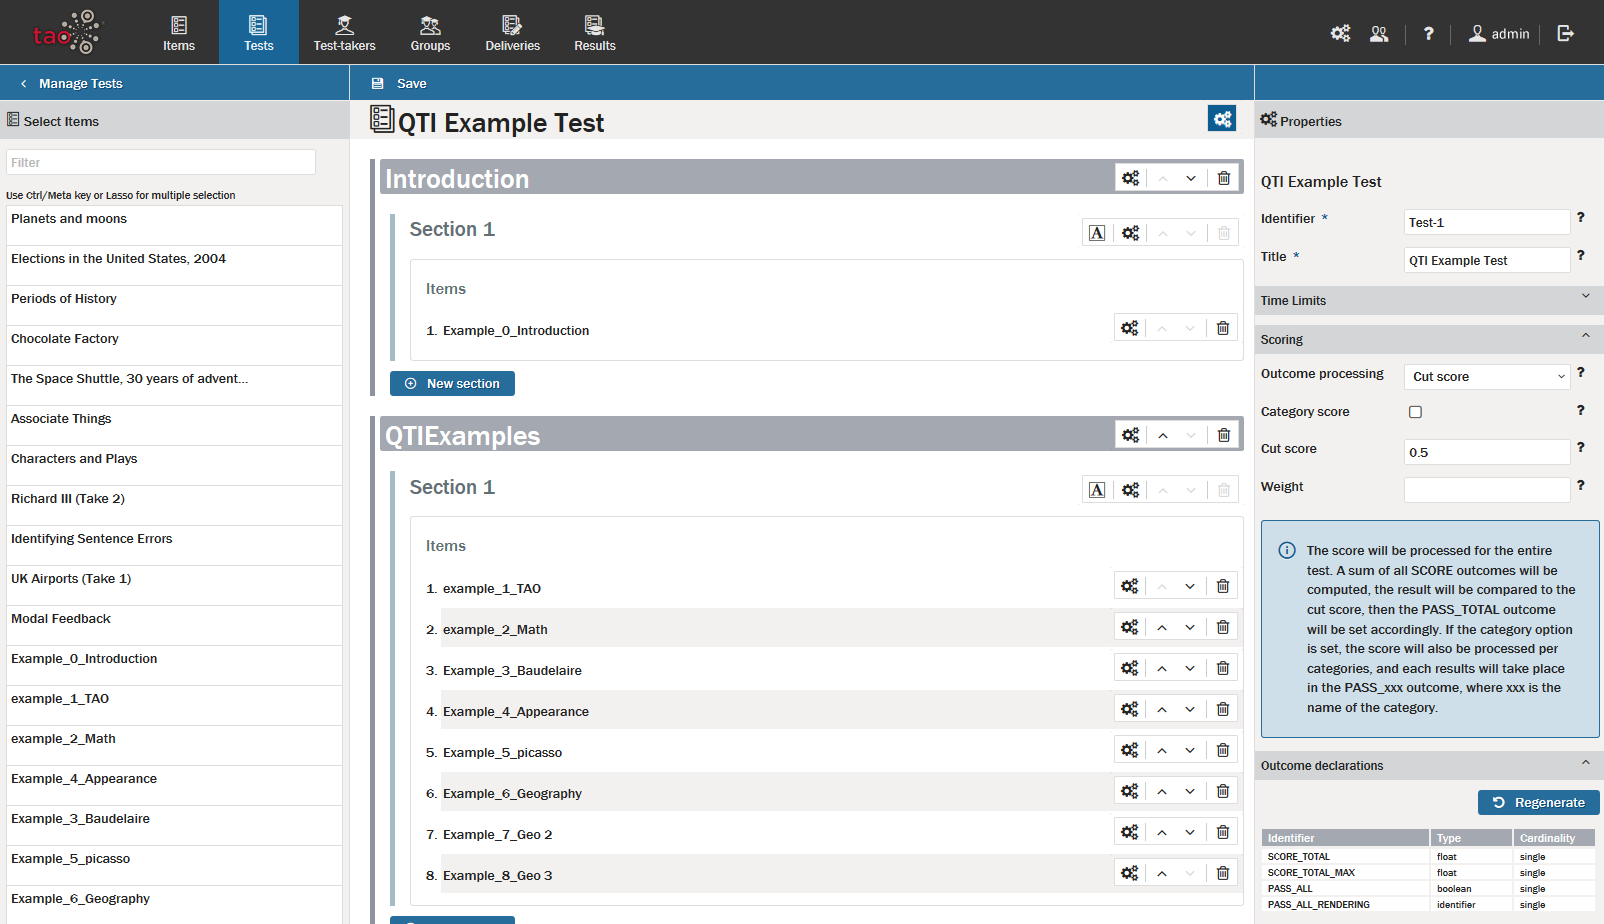
Scoring: Cut score
If you choose either of the latter methods (Total Score or Cut Score), some additional information may be required, depending on how you want to configure the test.
4. Defining different categories for your test
A check-box for Category Score will appear. If your test contains different categories, Category Score must be selected, so that the scores can be calculated for each category separately.
To assign your items to separate categories, click on the settings (cog wheels) icon to the right of a test Part, Section, or Item. In the Category box (located in the properties panel on the right), enter the name of the category you wish to assign the entire Part or Section, or individual item.

Test scoring: Categories
If you add a category to a test Part or Section, all the items under that Part or Section will default to include that category. However, you can remove a category for a specific item by selecting the settings (cog wheels) icon for that individual item and removed the category. This will not affect other items in the Part or Section.
5. Defining weights for the items in your test
Different weights can be assigned to different items of the test, based on how much they should contribute to the final test score.
1. To assign a weight, click on the settings icon to the right of the item for you wish to add a weight.
The item properties panel will open on the right.
2. Under Weights, select a Weight identifier and a value for that item.
The identifier refers to the weighting scheme you choose for the test. By default this is called ‘WEIGHT’, but if you want to use different weighting schemes in different test scenarios, you will need to define another one.
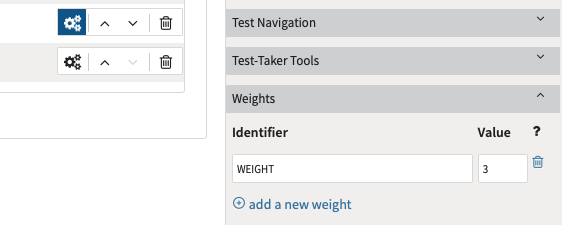
Assigning a weight to an item
The value refers to the weight you wish to assign to that item. For example, if a weight of 2 is entered, the score for that item is multiplied by 2 when calculating the final test score. If, for any item of the test, there is no such weight definition at the Item level, the scoring engine assumes the default value = 1.
3. To use the Weight identifier (and it’s corresponding values within individual items) to process the test’s score, return to the Test Properties.
Click on the cog wheels at the same level as the test label, just below the Action Bar, at the top of the right-hand corner of the Canvas. The general properties of the test will be displayed in the right-hand panel.
4. Under Scoring, enter the Weight identifier into the Weight text box.
If you have used the default Weight identifier, enter WEIGHT into the text box.
The Weight text box will only display if you have selected Total Score or Cut Score in Outcome processing.
It is possible to define different weights for the same item (in different weighting schemes), and then choose between them for different test scenarios. This may be useful if, for example, a test covers different topics, and in one particular test a certain topic is considered more important than the others. To do this, click on ‘Add a new weight’ below the original weight.
Viewing the test’s total points (after configuration)
When Total or Cut Score outcome processing is selected, the test authoring Properties tab displays a Maximum Number of Points table. This table shows total points a test taker can achieve, as well as category/weighted scores for the test (). This table updates instantly as you change items or scoring and can help test authors keep track of changes made to test and individual item scoring.
The field is represented as a table with different information, given the configuration of category scores and/or weights. For example, a test contains Geography questions for 6 points and History questions for 8 points; the curriculum requires that Geography has a coefficient of 2 and History a coefficient of 1.
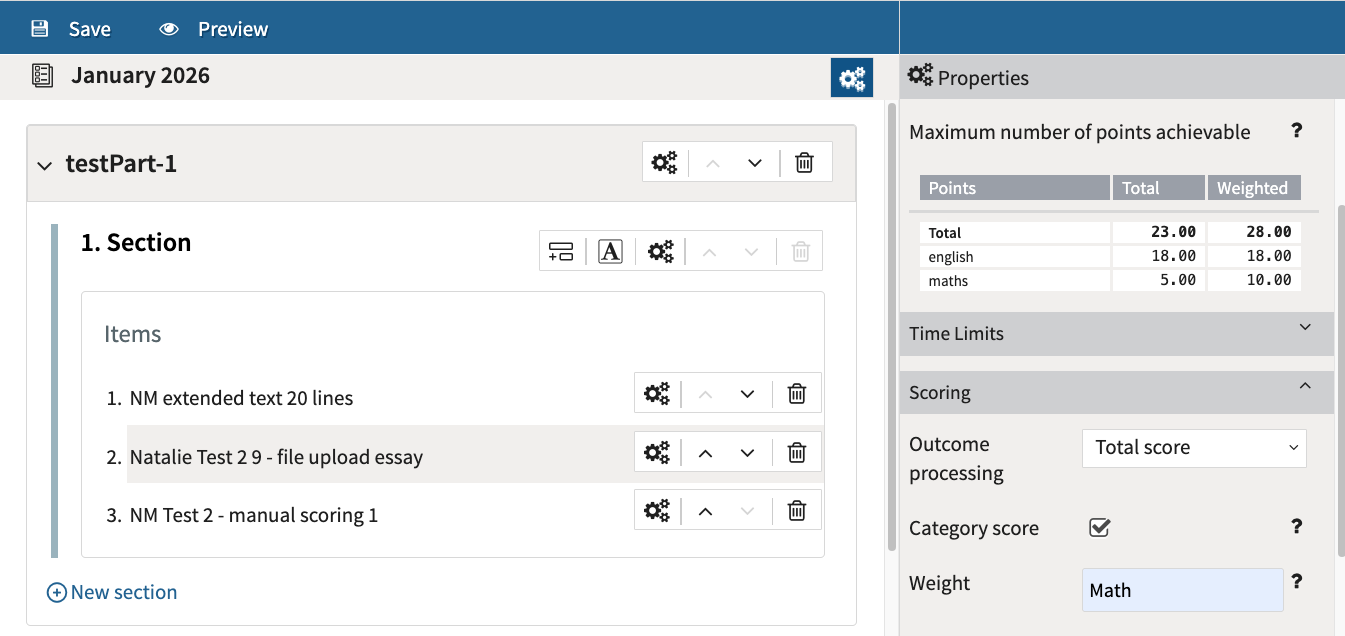
Total Score table in test authoring
Outcome Declarations
The Outcome Declarations (in Test Properties) are directly related to the scoring rules you have chosen above; the list of generated outcome variables is as follows:
If you selected None as the outcome processing method, all outcome variables are removed.
If you selected Total score as the outcome processing method, outcome variables are generated to calculate total scores.
If you selected Cut score, as the outcome processing method, outcome variables are generated to calculate total scores and variables which are checked against the cut-score which has been defined (typically pass/fail).
If a WEIGHT has been applied, additional outcome variables are generated to compute weighted scores.
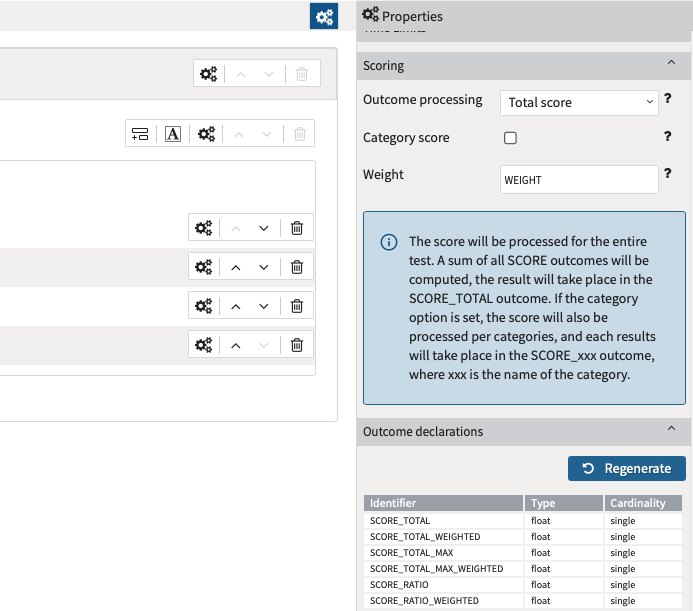
Outcome declarations - Total Score with Weights
Outcomes are generated automatically, but in the few cases where this does not occur, the values can be generated using the Regenerate button.
